Eye of the Day Holiday Gift Guide 2016

eod-holiday-gift-guide-2016
Eye of the Day Holiday Gift Guide 2016 (Click to Enlarge)

Are you looking for something unique or special this holiday season?  The Eye of the Day Holiday Gift Guide for 2016 has you covered. These gifts come from all around the world and are sure to be statement pieces in the home or garden.

1. French Anduze Pottery

Our handmade French terracotta Pottery from Anduze region in festive green and red make great decor not just for the holidays, but the whole year.

2. Karin Shelton Cards
Notecards featuring paintings by Santa Barbara Artist Karin Shelton. Her artwork subject matter ranges from abstract to botanical to landscape. 

3. Hand painted Tunisian Bowls
Crafted and hand painted from Tunisia, these bowls are food safe and lead free.

4. Chivas Skincare Facial Cream
From Filmore based skin care company and goat farm, this facial cream features a unique blend of goat milk, avocado oil, jojoba oil and vitamin E that deeply moisturizes and nourishes the skin.

5. Santa Rosa Mexican Church Candles
Our most popular Gift Shop item for a reason. These creamy candles are made with layers of paraffin and cotton wicks. Perfect for those cozy nights at home.

Visit our Eye of the Day showroom for more gift ideas or call 805-566-6500 regarding questions and availability on our gift guide products. Cheers!


Design Update with Inviting Spaces by Kim

Eye of the Day| Garden Design Update | Inviting Spaces by Kim

Design Update with Inviting Spaces by Kim 

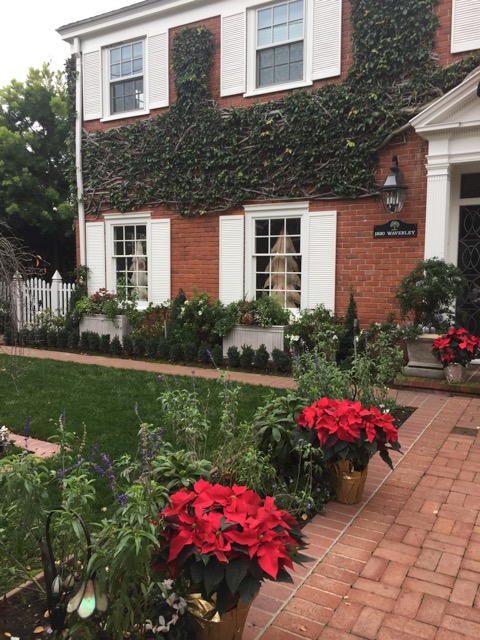
Eye of the Day’s large rectangular Italian terra cotta planters, the Delos, were installed recently to add impact, structure and curb appeal to the entrance of a home with an overgrown, out of proportion boxwood border.

Eye of the Day| Garden Design Update | Inviting Spaces by Kim The planters provided a win- win situation when combined with the ability to peer out each of the four windows from the living room and dining room with views of the beautiful seasonal flowers at window level.

The choice of the Delos by Kim Beber Perlmutter of Inviting Spaces by Kim was made when she saw that the vertical pattern on the planters echoed the pattern on the entrance pillars of her client’s Georgian style home, giving the impression that they were specifically designed for the space.


INVITING SPACES BY KIM

(650) 776-6123
Creating Inviting Spaces For Any Time of Day


The Clay Authority: Protecting Terracotta

The Clay Authority: Protecting Terracotta

As a fifth generation Californian, it’s easy for me to take beautiful weather and sunny, sandy beaches for granted, I also realize that for most of the country, this time of year presents some concerns when it comes to taking care of your garden and terracotta planters

Two years ago I wrote an article for Eye of the Day entitled “How it Works: Frost Proof Terra Cotta”. The big take away from this article are the two words “vitrify” and “porosity” that are of particular interest to those of you from areas concerned with freeze/thaw issues, due to the porosity of certain clay used to make planters.

The following month I continued with “Terra Cotta Transformations”, bringing the reader into the realm of technical ceramics by explaining what exactly happens with clay during its firing cycle.

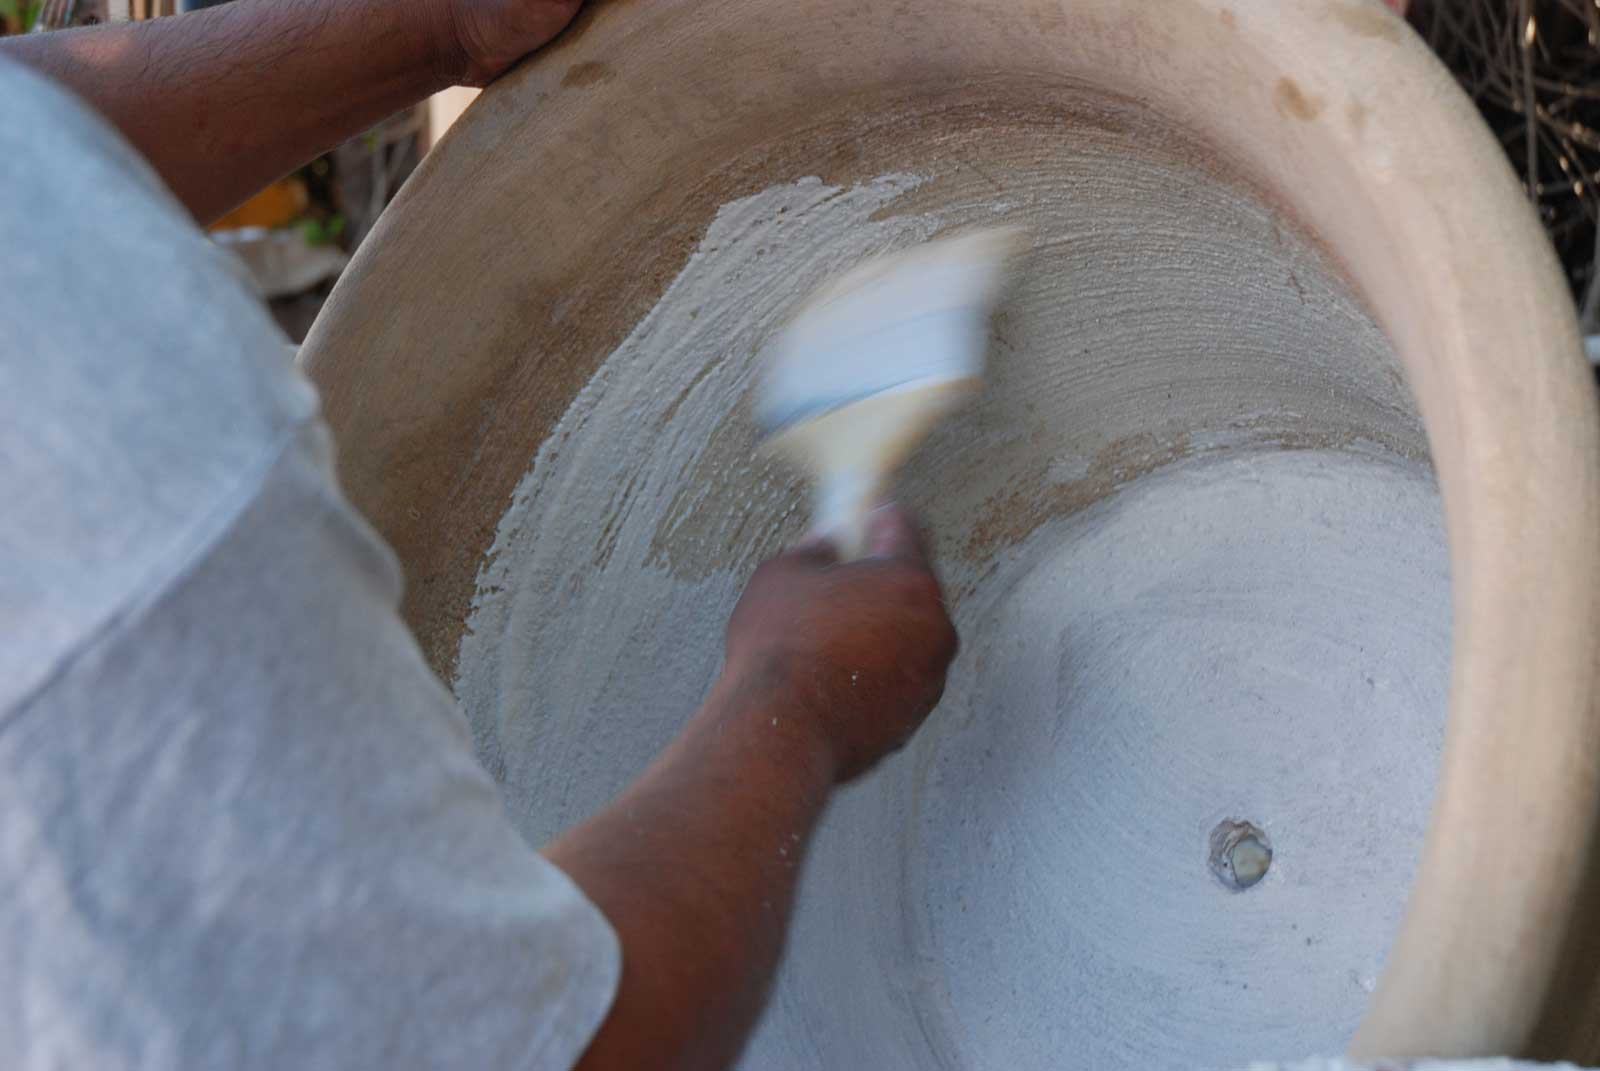
Freeze/thaw can be viewed as synonymous with expansion/contraction. But there are also many reasons to want to waterproof pottery. Although waterproofing and frost proofing pottery both pertain to porosity, frost proofing also deals with extreme temperatures.

So as we begin to move into winter and we consider protecting our garden pottery investments, here are a few things to think about:

Protection from Frost and Cold:
If you need to protect your terra cotta from freezing, either move it inside, cover the planter (and the plants), and definitely do not over water, or if possible, don’t water at all.  A quick test for the pottery itself would be to ask the dealer where you purchased the planters if they have any pot shards. Use them to test the durability of the pottery by soaking them in water, then put them in your freezer for a day or two. If it hasn’t cracked, take it directly from the freezer and put the shard in the sun. You’ll learn about the quality of your investment.

Waterproofing Terracotta:
If your concern is waterproofing your pottery, the research is simple to find a myriad of products on the market these days to seal low fire pottery (especially for tile). If it’s high fire then you don’t have to worry about water leeching through, especially if it’s been glazed.

Let’s all settle in for what always proves to be an elegant, sometimes challenging, yet always amazing time of year—Winter!

And if you ever have any technical questions about garden pottery, feel free to consult with me through EOD.


Lisa Cox Landscape Design: Before and After European Farmhouse Garden

Today, Eye of the Day interviews Lisa Cox of Lisa Cox Landscape Design on a recent project in Los Olivos, California. Lisa is a designer we love to work with and it’s always a joy when she stops by the showroom sourcing decor for her designs. As the season slowly transitions into Fall here in California, this Before and After project is a sign of good change to come.

Eye of the Day|Lisa Cox Landscape Design|Before and After European Farmhouse Eye of the Day: Tell us a little about yourself and this project.

Lisa Cox:  My company, Lisa Cox Landscape Design, tackles residential projects exclusively in the Santa Ynez Valley. After moving here 3 years ago, I could see there was most definitely a need for Landscape Designers in our area.  Since I was the new gal in town, I started slowly with residences in my area and a few Tasting Rooms in Los Olivos, and then that was a great boost for my business.

This particular project in Los Olivos was a European Farmhouse that needed a face lift. Considering the property was already a stunner, it was a delight to tackle the project.

EOTD: What was your client’s goal for this particular garden?
LC: The client wanted to completely rework the front garden to create a more traditional plant palette of roses and boxwood in tandem with drought tolerant plants that do well in the Santa Ynez Valley such as rosemary, lavender and olive trees. We think the outcome was very pleasant, and works well with her charming residence.

EOTD: What was your initial vision for this garden? 

LC: My initial vision was to recreate something you would see in Provence, France. Since the homeowner considers France their second home, it was even more of an inspiration to help with that “look.”

After removing most of the original planters, we created areas of interest such as a rose garden, shade garden, and sun drenched beauty garden!

EOTD: Were there any unique problems that came up during the design or installation?

LC: I think the biggest challenge was correctly reworking the existing irrigation system for the newly planted areas, and using good sized plants to create an “Instant yard.” The design phase was easy since the homeowner is a very gifted interior designer with a good eye. A great collaboration.

Eye of the Day|Lisa Cox Landscape Design|Before and After European Farmhouse
EOTD: What would you describe as your garden design aesthetic and how do you work with your client’s own vision for the landscape?

LC: Each project I tackle starts with the needs and wants of the client. Sometimes, their input is great, and other times, I am allowed complete freedom to create what I think will work for not only the style of their home, but function, flow and of course, aesthetics. As I start to design, it all seems to come together with time.

Before I start a design, I send out a list of questions for the client to answer that entails how they will use the space being created, substrate choices, and plant choices that appeal to them. This usually guarantees I can design freely knowing I am in line with their vision for their home.

Eye of the Day|Lisa Cox Landscape Design|Before and After European Farmhouse
EOTD: For the pottery, why these particular pieces? 

LC: The vintage Greek oil jar was a perfect fit to blend both a traditional and Mediterranean look with a touch of rustic created by the aging finishes Eye of the Day offers.

EOTD: What was your favorite part of this project and design?

LC: Most definitely working with the homeowner and creating a vision that not only gave her a little piece of France, but also how the end result screams Santa Ynez Valley and all our glory here in wine country.

To view more of Lisa’s work, visit Lisa Cox Landscape Design or her Facebook page.

Photo Credits: Rich Cox Photography


A Brief History of Fountains at Eye of the Day

Contemporary fountain design fess parker

A Brief History of Fountains at Eye of the Day

About twenty years ago, Brent and I had a life-changing meeting with the rep of a company that manufactures concrete garden ornaments. Of course, we didn’t know at the time it was life-changing. If anything, it was more “mystifying” to me. For reasons only apparent in Brent’s mind, we were choosing fountains that we would sell at our fledgling store, which we had named for our nine-year-old daughter, Daisy.

Honestly, I had never thought about fountains, they were alien to me, but there we were choosing three-tier fountains topped with angels, little fountains to put against a wall that were reminiscent of rocky outcroppings.

I had a favorite: two frogs on a loveseat sitting under an umbrella; water sliding down the concrete umbrella, protecting the love-frogs. So began our long-term relationship with fountains for the garden.

We have seen tastes change dramatically, though not everyone’s—animal figurines and faux-stone fountains are not so popular any longer.  Majestic, Mediterranean style concrete fountains have slowed down. About fifteen years ago, on a trip to France, Daisy and Brent came across a stone carver and soon fantastic hand-carved limestone fountains graced our showroom, and continue to do so.

In recent years we find that many of our customers want something completely different and decide to choose a beautiful pot, maybe a richly hued Gladding McBean Oil Jar or a rustic Greek Pithari and we convert their choice into a fountain, water glistening over the sides of the vessel and recirculation via a hidden pond.

And now, a few individuals have come to us with a new idea for their water feature, something we are excited to produce for them. The Modern or Mid-Century Modern trend is directing a movement toward vastly more contemporary looking fountains. So not only in architecture and home furnishings, we’re seeing many customers who want something with clean lines and no “frou-frou”.

contemporary fountains garden design
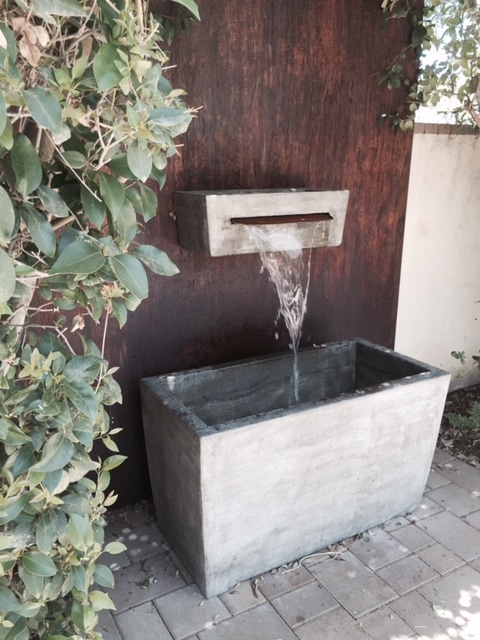
Both The Fess Parker Wine Country Inn and a well-known celebrity photographer asked us to fabricate a fountain that would complement a modern aesthetic.  We accomplished this by almost turning the concept upside down. Well, sideways, anyway. Using two rectangular concrete pots, we turned one on its side, cut a long, narrow piece from the center and inserted a copper “tongue” for the water to exit the piece and flow into a larger rectangle placed on the ground.

With the success of this custom fountain conversion design, we are not only producing fountains with an old world charm and a rustic look, but moving into the Mid-Century—so modern in our approach.  Working on more ideas, coming your way.


DIY Project How to Make a Succulent Fountain

DIY Succulent Fountain Conversion Garden Design

DIY: How to Make a Succulent Fountain 

Looking for a way to add a beautiful and water friendly feature to your garden? We’ve got the perfect garden project for your next weekend outdoors.

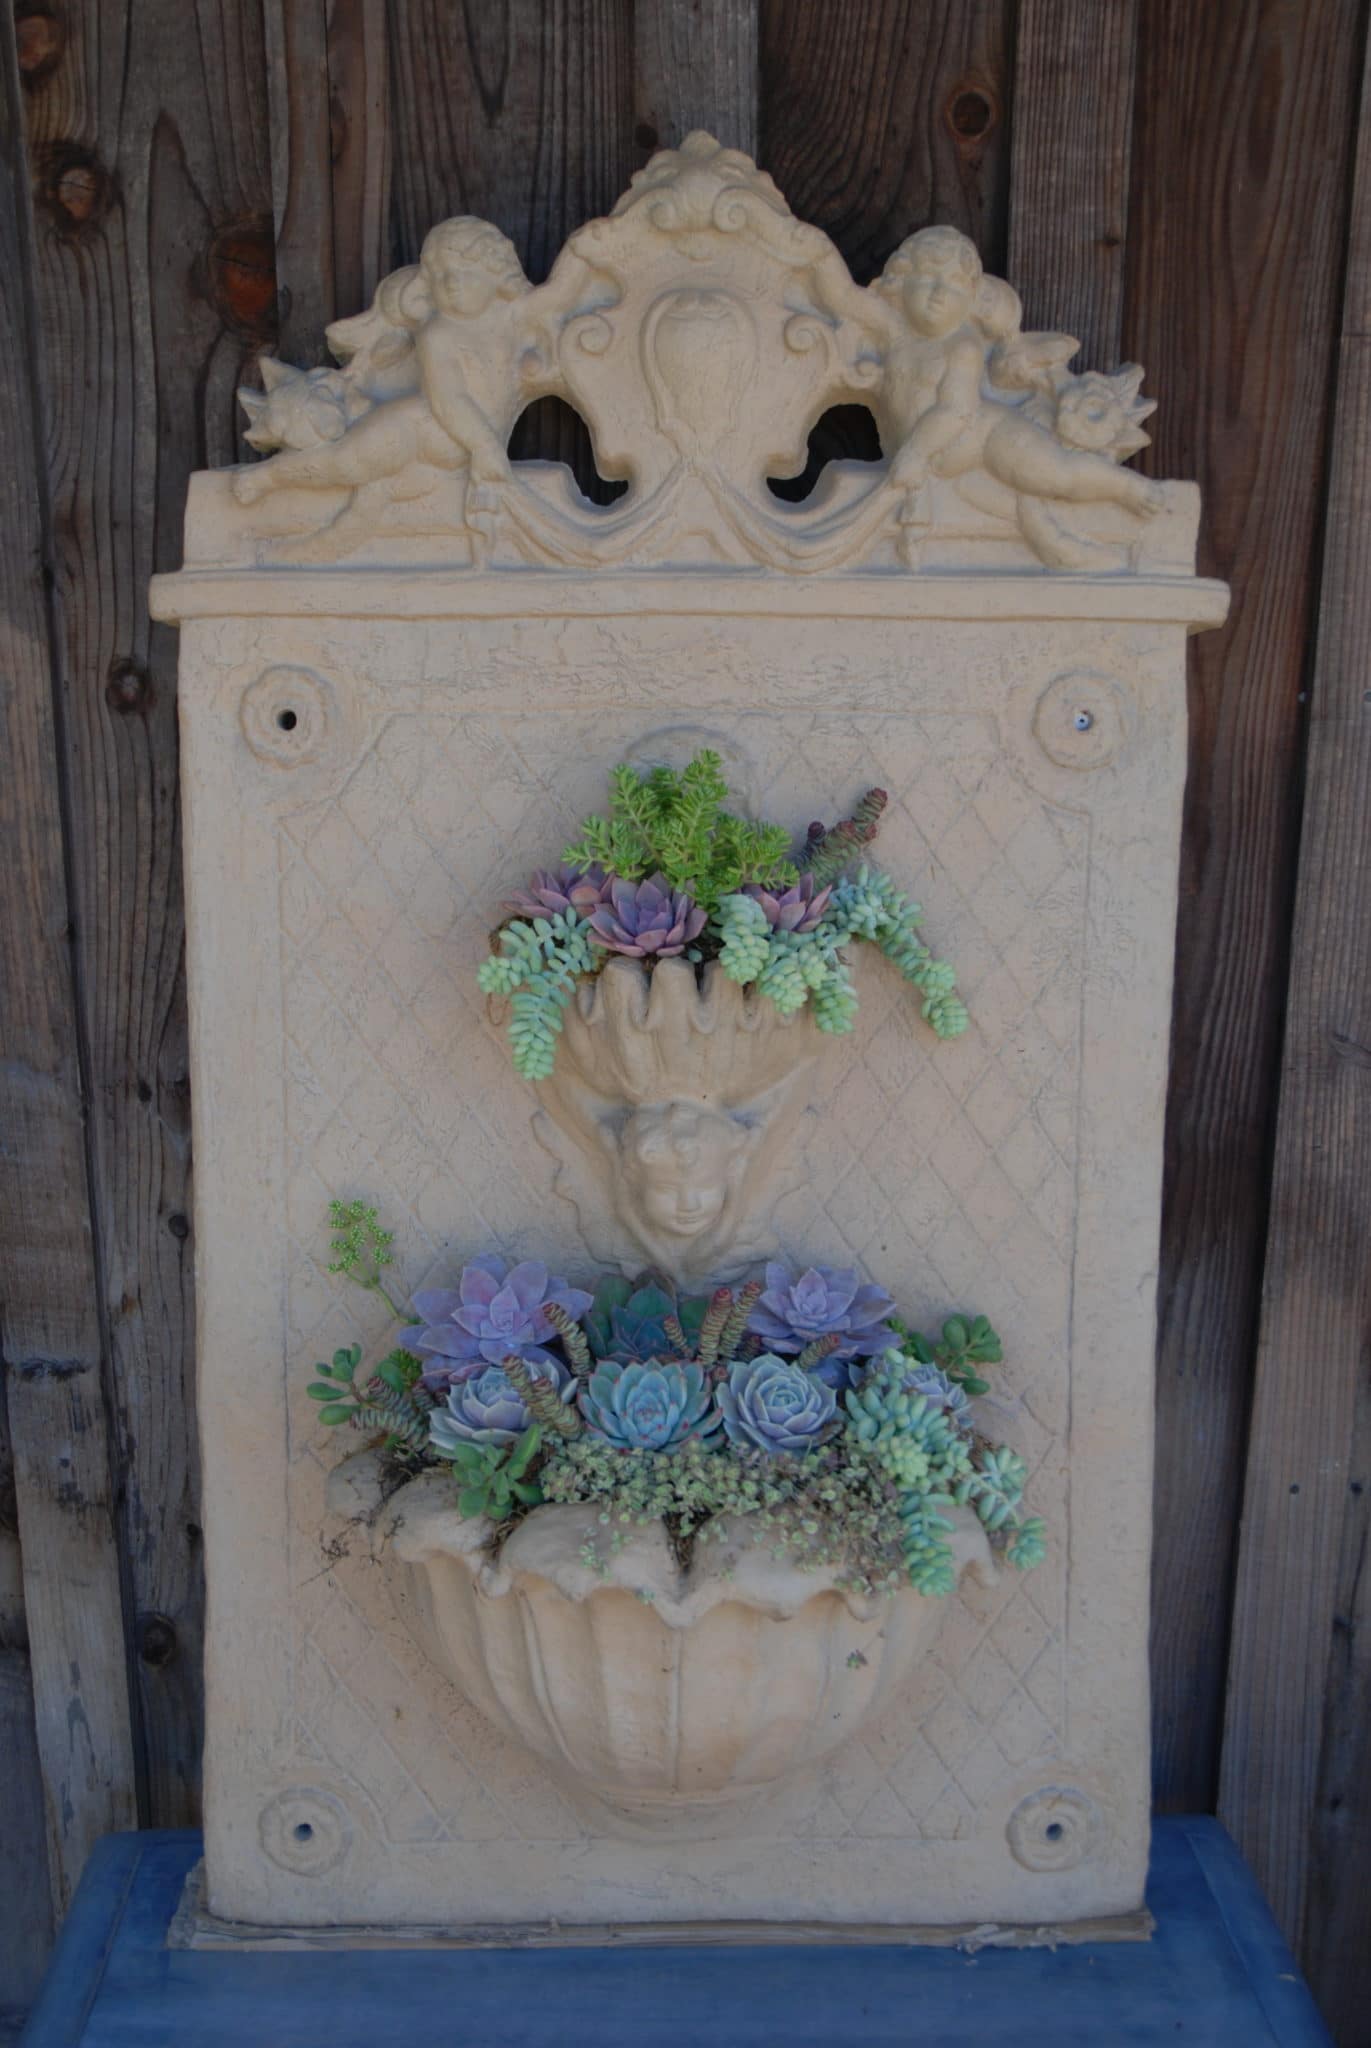
Here at Eye of the Day, Amelia Richardson, better known as Mimi, takes care of the succulent plantings around the store. An expert on succulents, she takes an overlooked wall fountain and transforms it into a beautiful container garden. This project is great not just for drought-stricken California, but any garden that gets enough sunlight throughout the year.

Here is a step-by-step guide to converting a fountain into a succulent fountain garden.

Step 1: Choose Your Vessel

Choose a fountain. It can be one meant to mount a wall, a standalone fountain, single or multi-tiered, or even a birdbath will do!

Step 2: Prep Your Container

Drain the fountain of water and make sure that any drainage holes are covered, if any. You can use a broken piece of pottery or terracotta. The soil will still shift so periodically check the draining that soil isn’t completely blocking it off.

You can also add a layer of rock gravel first before adding soil. If you’re using a birdbath, this step is a must.

Step 3: Add Your Soil

We recommend using cactus mix when planting succulents. It drains quickly which is good for plants that can’t sit in wet soil. We use EB Stone’s Organic Cactus Mix. If you live near Eye of the Day here in the Santa Barbara area, be sure to stop by and get some!DIY Succulent Fountain Conversion Garden Design

Step 4: Choose Your Succulents

When picking succulents, it will really depend on the planter. On large planters, you can choose a focal plant that you can work smaller succulents around. For example: A large Echeveria or Aeonium in the center that is worked around with smaller accent pieces like Sedum morganianum. 

Mimi Tips:

  • Have fun when picking succulents. Grouping like with like is also easier.
  • Color story: Jewel toned, all greens, chartreuses, blacks, cool tones versus warm tones
  • Textural: Soft, sharp, or hardy.
  • Shape: Round (Echeveria, aeonium, sempervivum), spiky (crassula, sansevieria), mix of large and small, tall and short. Senicio radicans and Sedum morganianum even mimic water flow as they drape over the edges.
  • Single type: Just one type of succulent for beginner planters. All rosette types are always pretty.

Step 5: Plan the Layout

Before you start the actual planting, place the succulents either on the ground or in the fountain as you imagine the final product. Here you can edit and rearrange as you see how it’ll all come together.

Sometimes planters can be organized and others more organic and wild. It will depend on the container and where it’s going.DIY Succulent Fountain Conversion Garden Design

Step 6: Start Planting

When removing a succulent from its plastic container, sometimes you’ll be transplanting to an area smaller than the soil around the succulent. You can remove much of the soil while still preserving the roots to get it to fit in the container spot.DIY Succulent Fountain Conversion Garden Design

Mimi Tip: Don’t be afraid to plant them close together. You can always leave space to let them fill out but getting into every nook and cranny helps to create its own ecosystem and that full growth actually slows down the propagation.

DIY Succulent Fountain Conversion Garden DesignBesides, you can always remove, replace and transplant—that’s the great nature of succulents. Succulents are hardy; they’re hard to ruin so press them into the soil. You can also use wet sheet moss to keep the plants moist and reduce the need for additional watering.

Step 7: Add Decorative Elements

Depending on the container get creative using shells, pieces of wood, rocks, broken pot or statue pieces, sea glass, etc. as added decorative material. If you prefer space between your succulents, these elements can help cover the soil.

DIY Succulent Fountain Conversion Garden Design

Step 8: Final Watering 

Give it a quick but generous soak and wash off the container with any leftover dirt. With succulents you want to water once or twice a week depending on sun and weather conditions. Soil should dry out (not completely bone dry) between watering. If soil is still damp you don’t need to water just yet.

If you’re using a container that does not have a drainage hole like a birdbath, then you would let it go bone dry between watering.

DIY Succulent Fountain Conversion Garden Design

Voila! You have a beautiful, water friendly, succulent fountain!


To check out another fun DIY project take a look at Design Rulz article on DIY Macrame Plant Hanger Patterns.